0. 목차
1. 개요
2. ganache(가나슈)
3. curl
4. web3
1. 개요
이번 포스팅에선 가나슈와 테스트코드 작성을 통해(jest) 트랜잭션을 발생시키는 걸 해보려한다.
이전 까지의 포스팅을 통해 전체적인 흐름을 잡았고,
이미 구성 되어있는 이더리움 네트워크를 이용하기 때문에
그닥 어려운 내용은 없는 것 같다.
2. 가나슈 (ganache)
가나슈는 로컬에서만 실행되는 이더리움이다.
npm install -g ganache-cli글로벌로 설치를 해주자.
가나슈는 마이닝 기능과 P2P 기능은 존재하질 않는다.
대신에,
블록과 체인 그리고 트랜잭션의 내용은 구현 되어있는데,
Transaction(트랜잭션 이하 Tx)이 발생되면, Tx가 발생되면 자동으로 해당 Tx를 담고 있는 block이 생성된다.
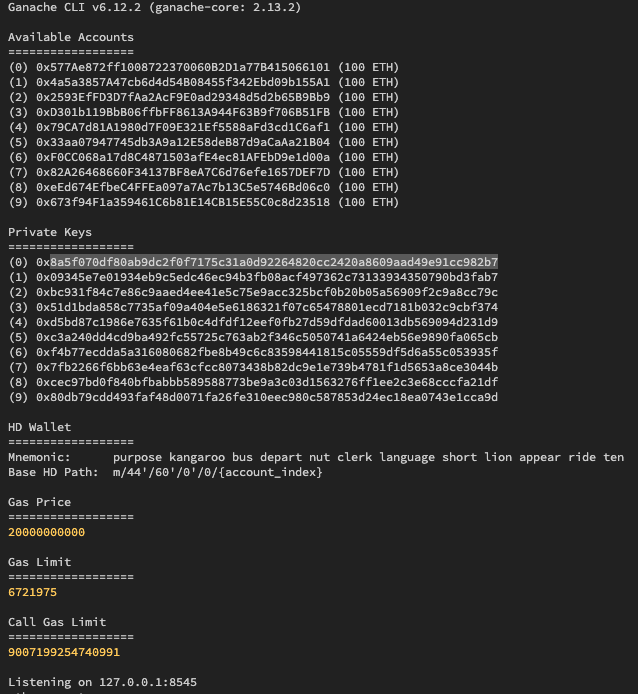
글로벌로 설치 했으니까
ganache-cli
명령어로 간단하게 실행시켜주면
요렇게 나온다.
3. curl
이더리움 공식문서에선 request 예시를 전부 curl로 작성되어 있다.
내가 직접 터미널에서 작성할 일은 아마 드물겠지만, 공식문서에 적혀있는걸 보고
이걸 포스트맨으로 다시 작성할 수 있어야 하기 때문에 대략적인 사용법은 익혀두는 게 좋을 것 같다.
# curl -X [요청종류] -H [헤더내용] --data [전송할 데이터] [url]
curl -X post -H "content-type:application/json" --data '{name:"ingoo"}' http://localhost:3000
eth_accounts
curl -X post -H "content-type:application/json" --data '{"jsonrpc":"2.0","method":"eth_accounts","params":[]}' http://localhost:8545
etc_getBalance
curl -X post -H "content-type:application/json" --data '{"jsonrpc":"2.0","method":"eth_getBalance","params":["0x577Ae872ff1008722370060B2D1a77B415066101"]}' http://localhost:8545
evm_snapshot
curl -X post -H "content-type:application/json" --data '{"jsonrpc":"2.0","method":"evm_snapshot","params":[]}' http://localhost:8545
evm_revert
curl -X post -H "content-type:application/json" --data '{"jsonrpc":"2.0","method":"evm_snapshot","params":[evm_snapshot의 리턴값]}' http://localhost:8545
4. web3
위의 요청들 + 공식문서에 나와있는 여러 요청들을 모아서 하나의 라이브러리로 만들어놓은 것이 있는데 그게 web3이다.
npm i web3
web3는 대부분의 언어로 이미 개발이 되어있다.
나는 js로 작업을 우선 해보고,
ts로 변경을 해보려고 한다.
그리고 web3를 테스트해보기 위해 테스트 코드를 작성할거다.
테스트 코드 작성은 jest를 이용할거다.
npm i -D jest
devDependency에 추가를 해주고,
jest.config.js 파일에 아래의 내용을 작성해주자
const config = {
verbose: true,
testMatch: ['<rootDir>/**/*.test.js'],
};
module.exports = config;
이렇게 작성을 해주면, jest 명령어 npx jest를 터미널에 실행하면 파일명에 .tset.js 가 붙은 모든 파일의 테스트코드를 동작시킨다
4-1. web3 연결 테스트
const Web3 = require('web3');
describe('web3 테스트 코드', () => {
let web3;
it('web3 연결 테스트', () => {
web3 = new Web3(new Web3.providers.HttpProvider('http://127.0.0.1:8545'));
console.log(web3);
});
});
web3 라이브러리를 땡겨오고,
테스트 코드를 작성해주자.
web3 라이브러리 내부에 있는 HttpProvider 생성자 함수를 통해 인스턴스를 생성해주고,
생성된 인스턴스를 인자로 받아서 Web3 생성자 함수를 실행시켜서 객체를 만들어주자.
console.log 로 리턴값을 찍어보면 굉장히 긴 객체가 떨어진다면, 연결에 성공한 것이다.
4-2. 최신 블록의 높이 가져오기
이번엔 최신블록의 높이를 가져오는 테스트 코드를 작성해보자.
  it('Latest Block 높이 가져오기', async () => {
    const latestBlock = await web3.eth.getBlockNumber();
    console.log(latestBlock);
  });
위의 코드를 추가로 작성한뒤에 jest를 작동시켜보자.
web3의 메서드들이 그냥 함수처럼 보이지만 사실 통신을 하는 함수이므로 async, await 또는 then,catch를 사용해야 한다.
현재는 블럭의 높이가 존재하지 않기 때문에 아마 리턴값이 0이 떨어질 것이다.
4-3. 노드의 모든 계정 가져오기
이번엔 account 정보를 가져오는 코드를 작성해보았다.
  it('전체 account 가져오기', async () => {
    accounts = await web3.eth.getAccounts();
    console.log(accounts);
    sender = accounts[0];
    received = accounts[1];
  });
첫번째 it 이전에 account를 전역변수로 설정해주었다.
ganache를 실행시켰을 때 나왔던 account 정보(10개)가 배열에 담겨 출력되는걸 확인할 수 있다.
이후에 트랜잭션을 만들어보기 위해 배열의 첫번째 값과 두번째 값을 각각 sender 변수와 received 변수에 담아주었다.
4-4. account를 이용해서 balance 조회
이번엔 가져온 어카운트 정보로 특정 어카운트의 balance를 조회 해보자.
  it('get balance from first account', async () => {
    const balance = await web3.eth.getBalance(accounts[0]);
    console.log(balance); //100000000000000000000
  });
위의 코드는 첫번째 계정의 밸런스를 조회하는 코드이다.
그런데 모든 계정에는 현재 100ETH가 있는데 리턴되는 숫자는 어마무시하게 큰 숫자가 나온다.
이더리움은 사용하는 단위가 굉장히 많다.
기본적으로 1ETH 는 10**18wei 이다.
자세한건 아래 그림 참조.

그리고 web3에는 위의 단위를 변환 시켜주는 함수 또한 존재한다. 테스트코드 를 통해 작성해보자
  it('ETH 단위 변경해보기', () => {
    console.log(web3.utils.toWei('1', 'gwei'));
    console.log(web3.utils.toWei('1', 'ether'));
  });
첫번째 console.log는 1gwei를 wei로,
두번째 console.log는 1ETH 를 wei로 변환 시켜서 출력해준다.
4-5. nonce 값 구하기
이번에는 sender 계정이 몇번의 트랜잭션을 거쳤는지 확인해보는 코드를 작성해보자.
이게 왜 필요힌가 싶겠지만, 이 값이 추후 transaction의 nonce값이 될거다.
  it('check Tx count', async () => {
    const senderTxCount = await web3.eth.getTransactionCount(sender);
    console.log(senderTxCount);
  });
기존의 포스팅에서 POW를 구현할 때 nonce라는 개념이 나왔는데 이 개념과는 다른 개념이다.
블록의 nonce는 특정한 해시값을 뽑아내기 위해 만들어지는 랜덤한 숫자라면,
이더리움에서의 transaction nonce는 각 계정이 발생시킨 트랜잭션의 key값 또는 index라고 생각하면 된다.
4-6. Transaction(트랜잭션) 발생시키기
이번에는 web3를 통해 트랜잭션을 발생시켜 보자.
트랜잭션의 내용에는
서명의 내용이 필수적으로 들어가는데,
기존의 포스팅에서는 직접 서명의 내용을 만들었다면,
이번에는 라이브러리를 써서 편안하게 만들어보자
npm i ethereumjs-tx
위 명령어를 터미널에 입력해서 라이브러리를 설치를 해주자.
그리고 문서 상단에 require 를 이용해서 라이브러리를 땡겨오자
const ethTx = require('ethereumjs-tx').Transaction;
ethTx는 transaction을 만들어주는 생성자 함수이다.
트랜잭션에 들어갈 내용을 객체로 만들어서 그걸 인자값으로 넣고 new키워드를 이용해서 호출하면
트랜잭션 인스턴스를 생성해준다.
트랜잭션에 들어갈 내용은 저번 포스팅 에서 간략하게 적었었다.
- 논스(nonce)
- 가스가격(gas price)
- 가스 한도(gas limit)
- 수신자(to)
- 값(value)
- 데이터(data)
- v,r,s(signature의 세가지 구성요소)
엥.. 수신자(to)는 있는데 발신자(from)이 없다.
우선은 없다 라는 것만 알고 넘어가자.
signature(서명)을 설명하면서 한꺼번에 설명을 하겠다.
우선 테스트 코드를 작성할 it 구문을 만들어주자.
it('Fire Transaction',()=>{
  //코드 작성할 공간
})
위에 적혀있는 트랜잭션의 요소들을 하나하나 만들어보자.
우선 nonce는 위의 4-5에서 했었다.
발신자가 몇번의 트랜잭션을 발생시켰는가 가 트랜잭션의 nonce가 된다고 했었다.
그러니까 nonce 는
it('Fire Transaction',()=>{
  const nonce = await web3.eth.getTransactionCount(sender);
});
요렇게 만들 수 있다.
그런데 새로 만들어지는 transaction 의 nonce 값은 기존 값보다 +1 이 되어야 하는거 아닌가?
라는 생각이 들수 있는데,
그 처리는 정말 감사하게도, 이더리움 네트워크에서 처리 해주는 듯 하다.
다만, 값을 16진수로 변경해주는 작업은 해야한다.
해서,
it('Fire Transaction',()=>{
  const nonce = web3.utils.toHex(await web3.eth.getTransactionCount(sender));
})
요렇게 변경해주는 작업은 해야한다.
가스 가격(gasPrice)와 가스 한도(gasLimit)은 수수료에 대한 내용이다.
가스 가격은 발신자가 정한 가스 한개당 지불할 비용이고,
가스 한도는 이 트랜잭션에서 사용할 최대 가스 갯수이다.
즉, 위 트랜잭션에 대한 수수료는
가스가격(gasPrice) * 사용되는 가스의 갯수 이다.
그리고 가스의 갯수는 data에 들어갈 smart contract 코드가 사용하는 메모리에 따라 측정되는데.
아직은 smart contract의 내용은 다루지 않을 것이니,
자세한 내용은 기술부채로 남겨두자.
발신자가 가스가격을 굳이 비싸게 책정할 이유가 있을까 라는 의문이 드는데,
이건 이더리움의 특성때문에 그렇다.
비트코인 같은경우는 UTXO라는 기술을 이용하기 때문에,
트랜잭션의 내용이 블록에 담기지 않아도 balance가 변경되는걸 확인 할 수 있고,
트랜잭션 풀(맨풀)에 있는 트랜잭션을 순차적으로 가져와서 블록에 담지만,
이더리움은 UTXO라는 개념 자체를 사용하지 않는다.
트랜잭션의 내용이 블록에 담겨야만, Balance의 변경도 일어난다.
또한, 이더리움은 트랜잭션 풀에 있는 트랜잭션의 내용을 순차적으로 블록에 담지 않고,
수수료가 높게 책정된 트랜잭션을 우선적으로 블록에 담는다.
그렇기 때문에 발신자가 자신의 트랜잭션이 우선적으로 블록에 담기길 원한다면
가스비를 높게 책정할 것이다.
이론적인 부분은 이정도로 각설하고 마저 코드를 작성해보자.
it('Fire Transaction',()=>{
  const nonce = web3.utils.toHex(await web3.eth.getTransactionCount(sender));
  const gasPrice = web3.utils.toHex(web3.utils.toWei('1','gwei'));
  const gasLimit = web3.utils.toHex(6721975);
})
가스 가격은 1gwei로 책정했는데, 트랜잭션을 만들때는 최소단위인 wei로 변경해서 보내야 한다.
그리고 변경한 내용을 다시 hex로 변경해주자.
가스 한도는 ganache를 최초 실행 시킬때 나오는 gasLimit을 그대로 작성해 주었다.
it('Fire Transaction',()=>{
  const nonce = web3.utils.toHex(await web3.eth.getTransactionCount(sender));
  const gasPrice = web3.utils.toHex(web3.utils.toWei('1','gwei'));
  const gasLimit = web3.utils.toHex(6721975);
  const to = received;
  const value = web3.utils.toHex(web3.utils.toWei('1','ether'));
});
수신자는 위에서 만들어 두었던 변수 received를 그대로 받아서 사용했고,
value(보낼 금액)은 1ETH를 보낼 건데, 마찬가지로 최소단위 wei로 변경한 뒤,
hex로 변경한 값을 할당했다.
마지막으로 data를 만들면 된다.
it('Fire Transaction',()=>{
  const nonce = web3.utils.toHex(await web3.eth.getTransactionCount(sender));
  const gasPrice = web3.utils.toHex(web3.utils.toWei('1','gwei'));
  const gasLimit = web3.utils.toHex(6721975);
  const to = received;
  const value = web3.utils.toHex(web3.utils.toWei('1','ether'));
  const data = web3.utils.toHex('');
});
원래라면 smart contract의 내용이 담겨야 하지만,
아직은 다루지 않을 예정이기에 빈문자열을 hex로 변경시켜서 할당해주었다.
이제 이걸 가지고 트랜잭션을 만들면 된다.
it('Fire Transaction',()=>{
  const nonce = web3.utils.toHex(await web3.eth.getTransactionCount(sender));
  const gasPrice = web3.utils.toHex(web3.utils.toWei('1','gwei'));
  const gasLimit = web3.utils.toHex(6721975);
  const to = received;
  const value = web3.utils.toHex(web3.utils.toWei('1','ether'));
  const data = web3.utils.toHex('');

  const txObj = {nonce, gasPrice, gasLimit, to, value, data};

  const tx = new ethTx(txObj);
});
요렇게 해주면 된다.
이걸 줄여서 쓰고 싶으면,
it('Fire Transaction',()=>{
const txCnt = await web3.eth.getTransactionCount(sender);
const txObject = {
nonce: web3.utils.toHex(txCnt),
to: received,
value: web3.utils.toHex(web3.utils.toWei('1', 'ether')),
gasLimit: web3.utils.toHex(6721975),
gasPrice: web3.utils.toHex(web3.utils.toWei('1', 'gwei')),
data: web3.utils.toHex(''),
};
const tx = new ethTx(txObject);
});
요렇게 쓰는게 좀더 깔끔할지도.
취향차이일듯.
이렇게 transaction 의 내용을 다 작성한 것 같지만 아직 아니다.
아직 signature의 내용은 작성하지 않았다.
근데 signature 만드는거 라이브러리가 해준다.
개꿀
it('Fire Transaction',()=>{
const txCnt = await web3.eth.getTransactionCount(sender);
const txObject = {
nonce: web3.utils.toHex(txCnt),
to: received,
value: web3.utils.toHex(web3.utils.toWei('1', 'ether')),
gasLimit: web3.utils.toHex(6721975),
gasPrice: web3.utils.toHex(web3.utils.toWei('1', 'gwei')),
data: web3.utils.toHex(''),
};
const tx = new ethTx(txObject);
const privateKey = Buffer.from(
'프라이빗 키', // ganache 실행시킬 때 나오는 private key 중 sender 에 해당하는 key
'hex'
);
tx.sign(privateKey);
});
요렇게만 해주면, 자동으로 tx 인스턴스에 s,r,v 의 내용이 추가된다.
그런데 아직까지도 발신자에 대한 내용이 없다.
왤까.
사실 여기서 부턴 킹리적 갓심, 즉, 뇌피셜이다.
발신자(from)의 내용은 트랜잭션을 발생시킨 사람의 계정(account)일 것이다.
그런데 account 는 publicKey를 통해 만들어지고,
publicKey는 privateKey를 통해 만들어진다.
아마도, sign 메서드를 호출할 때 인자값으로 사용된 privateKey를 이용해 publicKey를 만들고,
생성된 transaction 어딘가에다가 끼워 놓았다가,
트랜잭션을 이더리움 네트워크에 전송하고,
이더리움 네트워크는 전달 받는 signature와 publicKey를 이용해서 transaction을 검증한뒤,
전달 받은 publicKey를 이용해서 account(EOA)를 생성하고,
생성된 account 내용을 from으로 transaction에 추가해서 블록에 담는게 아닐까....
하는 추측을 해보는데,
음 얼추 맞지 않을까 싶다.
그럼 여기서 바로 이더리움 네트워크에 전송을 하면 되느냐,
아직 아니다. 한가지 작업을 더 해줘야한다.
그건 객체의 순서를 맞춰주는 작업이다.
이 작업이 왜 필요한가하면,
transactionHash를 만들기 위해서다.
개발자마다, 위의 txObj 를 만드는 순서는 제각각 일것이다.
그런데, transactionHash는 transacton 의 value들만 string으로 연결한 뒤,
Hash화를 하기 때문에, 순서가 달라지면 전혀 다른 hash가 나온다.
이를 방지 하기위해 객체 프로퍼티의 순서를 맞춰주는 작업이 필요하다.
근데 이것도 라이브러리가 해줌^^ 개꿀
it('Fire Transaction',()=>{
const txCnt = await web3.eth.getTransactionCount(sender);
const txObject: ethereumTx.TxData = {
nonce: web3.utils.toHex(txCnt),
to: received,
value: web3.utils.toHex(web3.utils.toWei('1', 'ether')),
gasLimit: web3.utils.toHex(6721975),
gasPrice: web3.utils.toHex(web3.utils.toWei('1', 'gwei')),
data: web3.utils.toHex(''),
};
const tx = new ethTx(txObject);
const privateKey = Buffer.from(
'프라이빗 키', // ganache 실행시킬 때 나오는 private key 중 sender 에 해당하는 key
'hex'
);
tx.sign(privateKey);
const serializedTx = tx.serialize();
});
짠
안에 내용도 다채웠고, 순서도 맞춰줬다.
이제 이더리움 네트워크에 전달만 하면 된다.
it('Fire Transaction',()=>{
const txCnt = await web3.eth.getTransactionCount(sender);
const txObject: ethereumTx.TxData = {
nonce: web3.utils.toHex(txCnt),
to: received,
value: web3.utils.toHex(web3.utils.toWei('1', 'ether')),
gasLimit: web3.utils.toHex(6721975),
gasPrice: web3.utils.toHex(web3.utils.toWei('1', 'gwei')),
data: web3.utils.toHex(''),
};
const tx = new ethTx(txObject);
const privateKey = Buffer.from(
'프라이빗 키', // ganache 실행시킬 때 나오는 private key 중 sender 에 해당하는 key
'hex'
);
tx.sign(privateKey);
const serializedTx = tx.serialize();
const sentTx = await web3.eth.sendSignedTransaction(
serializedTx.toString('hex')
);
console.log(sentTx);
});
콘솔이 잘 찍힌다면 성공이다.
그럼 정말로 잘 전송이 됐는지 확인을 해보기 위해,
발신자의 balance와 수신자의 balance를 체크해보자.
it('check balance After Tx', async () => {
const senderBal = await web3.eth.getBalance(sender);
const receivedBal = await web3.eth.getBalance(received);
console.log('senderBal : ', senderBal / 10 ** 18);
console.log('receivedBal : ', receivedBal / 10 ** 18);
});
전달 해주는 단위 뿐만 아니라,
전달 받는 단위 또한 최소단위인 wei이기 때문에
ETH로 변경을 위해 10**18으로 나눠 주었다.
수신자의 balance가 1ETH가 추가되어있고,
발신자의 balance가 1ETH + 수수료 만큼 차감 되어 있다면,
잘 된거다.
마지막으로 js 로 작성했던 것을
typescript로 변경하는 작업을 했었는데,
어차피 내용은 똑같으니까 전체코드만 올려 놓을거임
import Web3 from 'web3';
import * as ethereumTx from 'ethereumjs-tx/';
const ethTx = ethereumTx.Transaction;
describe('web3 테스트 코드', () => {
let web3: Web3;
let accounts: string[];
let sender: string;
let received: string;
it('web3 연결 테스트', () => {
web3 = new Web3(new Web3.providers.HttpProvider('http://127.0.0.1:8545'));
console.log(web3);
});
it('Get Latest Block number', async () => {
const latestBlock = await web3.eth.getBlockNumber();
const test = web3.utils.toWei('1', 'ether');
console.log(latestBlock);
});
it('Get all of accounts', async () => {
accounts = await web3.eth.getAccounts();
console.log(accounts);
sender = accounts[0];
received = accounts[1];
});
it('Get balance from first account', async () => {
const balance = await web3.eth.getBalance(accounts[0]);
console.log(balance);
});
it('Change Ethereum unit', () => {
console.log(web3.utils.toWei('1', 'ether'));
});
it('Get Tx Nonce', async () => {
const senderTxCount = await web3.eth.getTransactionCount(sender);
console.log(senderTxCount);
});
it('Fire Transaction', async () => {
const txCnt = await web3.eth.getTransactionCount(sender);
const privateKey = Buffer.from(
'8a5f070df80ab9dc2f0f7175c31a0d92264820cc2420a8609aad49e91cc982b7',
'hex'
);
const txObject: ethereumTx.TxData = {
nonce: web3.utils.toHex(txCnt),
to: received,
value: web3.utils.toHex(web3.utils.toWei('1', 'ether')),
gasLimit: web3.utils.toHex(6721975),
gasPrice: web3.utils.toHex(web3.utils.toWei('1', 'gwei')),
data: web3.utils.toHex(''),
};
const tx = new ethTx(txObject);
tx.sign(privateKey);
const serializedTx = tx.serialize();
const sentTx = await web3.eth.sendSignedTransaction(
serializedTx.toString('hex')
);
console.log(sentTx);
});
it('check balance After Tx', async () => {
const senderBal = await web3.eth.getBalance(sender);
const receivedBal = await web3.eth.getBalance(received);
console.log('senderBal : ', Number(senderBal) / 10 ** 18);
console.log('receivedBal : ', Number(receivedBal) / 10 ** 18);
});
});
'경일 > Block-chain' 카테고리의 다른 글
| [block-chain / 블록체인] Solidity(솔리디티)작성 과 contract(스마트컨트랙트) 배포 (1) | 2022.07.11 |
|---|---|
| [Block-chain / 블록체인] Geth 이용해서 Private Network 만들기 (1) | 2022.06.30 |
| [Block-chain/블록체인] Mac GETH 설치 (1) | 2022.06.27 |
| [Block-chain/블록체인] Ethereum(이더리움) / EVM / Account / EOA / CA / Transaction(트랜잭션) / GEth (0) | 2022.06.27 |
| [Blockchain/블록체인] Wallet(지갑)/PrivateKey(개인키)/PublicKey(공개키)/account(계정) 톺아보기 (0) | 2022.06.20 |

댓글